For those who already have Minus and Pickles patterns, this cactus should look very familiar since it’s one of the main “characters” of the photoset that I use for Mijn Grote Familie. Because… who doesn’t love cactuses? They come in thousands of different shapes and colours. You’ll find one in almost each house, so we definitely needed one crochet cactus in our little miniature amigurumi house .
Las que tenéis los patrones de Minus y Pickles lo conocéis ya, ya que suele ser un protagonista clave en mis fotos de Mijn Grote Familie. Y es que… ¿a quién no le gustan los cactus? Los hay de mil formas y colores distintos. Es rara la casa en que no hay alguno, por lo que claro, en nuestra pequeña casa en miniatura de amigurumis no podía faltar un cactus de ganchillo.

Internet está repleto de cactus de ganchillo, no tienes más que pasearte 5 minutos por la blogosfera o por Pinterest y encontrarás infinita variedad de patrones. Este que os traigo yo es bien sencillito y básico, para principiantes. Os aconsejo que si os gusta, investiguéis y os compréis algún patrón, que los hay realmente maravillosos. También podéis innovar e inventaros los vuestros propios, que siempre es muy divertido. Y… apuesto a que sea cual sea el resultado, seguro que hay algún cactus parecido en la Naturaleza.
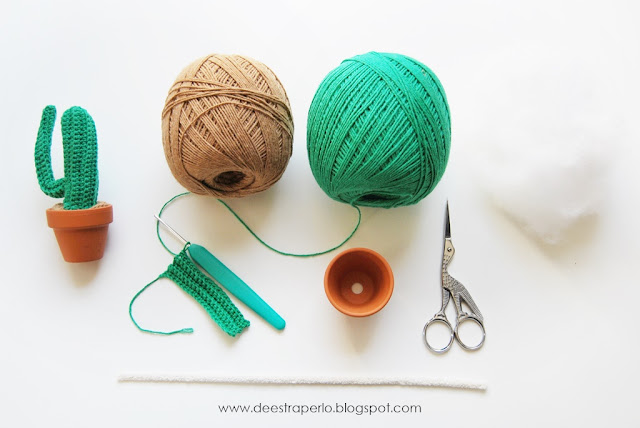
These are the materials you’re going to need:
- Green cotton yarn
- Brown cotton yarn
- A suitable crochet hook for your yarn. (Since Minus is crocheted with a 2,5mm hook, I’ve used this one for the cactus as well.)
- Clay pot (I bought mine in a miniatures shop. If you can’t find any try to make one yourself, for example with the cap of a softener bottle. Paint it or cover it with crochet)
- Pipe cleaner
- Polyfill stuffing
- Tapestry needle
- Scissors
Los materiales que vas a necesitar son:
- Un poco de algodón verde
- Un poco de algodón marrón
- Una aguja de ganchillo adecuada (en este caso, como es un cactus para Minus, lo he hecho con la misma aguja de 2,5 mm que he usado para hacerlo a él)
- Maceta para el cactus (yo he usado una pequeña maceta de arcilla que encontré en una tienda de miniaturas, si no encuentras ninguna puedes usar por ejemplo un tapón de suavizante y forrarlo de ganchillo, o pintarlo…)
- Limpiapipas
- Relleno sintético
- Aguja lanera
- Tijeras
Our basic cactus consists of a body, an arm and a base:
Body:
Foundation row: Using the green cotton yarn, chain 21
1st round: 20 single crochet (sc)
2nd to 14th round: chain 1, 20 sc in back loop (bl)
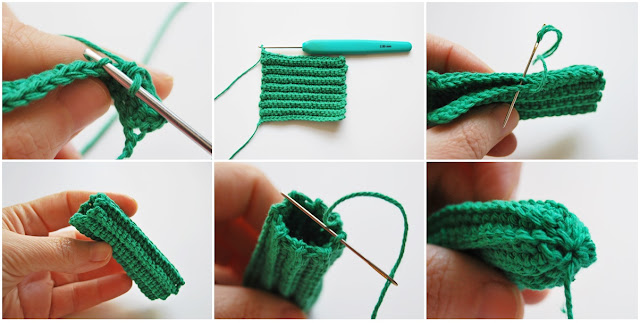
Once you’ve crocheted the rectangle, you have to join the first and the last round, with the tapestry needle, in order to form a cylinder, as you can see on the pictures above. Now you have to close one of the cylinder ends, by passing the tapestry needle through each of the row ends and pulling the yarn until you close it. The body is ready.
Nuestro cactus básico consta de 3 partes: cuerpo, brazo y base:
Cuerpo:
Cadeneta base: Con el algodón verde haz 21 cadenetas (cad)
1ª fila: 20 puntos bajos (pb)
2ª a 14ª fila: 1 cad y 20 pb en back loop (bl)
Una vez has tejido tu rectángulo tienes que unir la primera y la última fila, con la aguja lanera, para formar un cilindro, como ves en las fotos.
Ahora debes cerrar uno de los extremos del cilindro. Pasa la aguja lanera por cada una de los extremos de las filas y tira del hilo hasta cerrar el agujero. Ya tienes listo el cuerpo.
For the arm you’ll follow the same system but changing the number of chains and rows:
Arm:
Foundation row: Using the green cotton yarn, chain 19
1st row: 18 sc
2nd to 7th row: chain 1, 18 sc
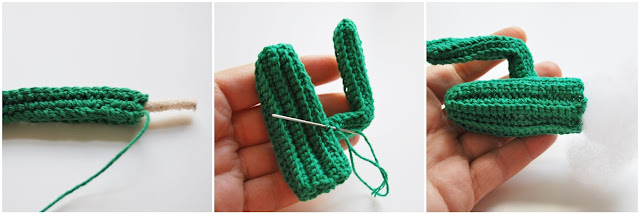
Now close the cylinder and the end as you’ve made with the body and insert the pipe cleaner. Give the shape that you like and attach it to the body. You can add more arms, change the number of chains and rows and create different cactuses. Try new things!
You can now stuff the body a bit (different amount of stuffing will also provide different looks), and let’s see the last part, the base.
Para el brazo seguiremos el mismo sistema pero variando un poco el número de cadenetas base y de filas:
Brazo:
Cadeneta base: Con al algodón verde haz 19 cad
1ª fila: 18 pb
2ª a 7ª fila: 1 cad, 18 pb
Ahora cierra el cilindro y el extremo al igual que has hecho con el cuerpo y pon el limpiapipas dentro. Dale la forma que quieras y cóselo con la aguja lanera al cuerpo. Esta es otra oportunidad para experimentar, pon tantos brazos como quieras, haz distintos brazos, más largos, más anchos… Prueba cosas nuevas!
Ya puedes rellenar un poco el cuerpo (dependiendo de la cantidad de relleno tu cactus se verá diferente) y pasamos a la última parte, la tierra.
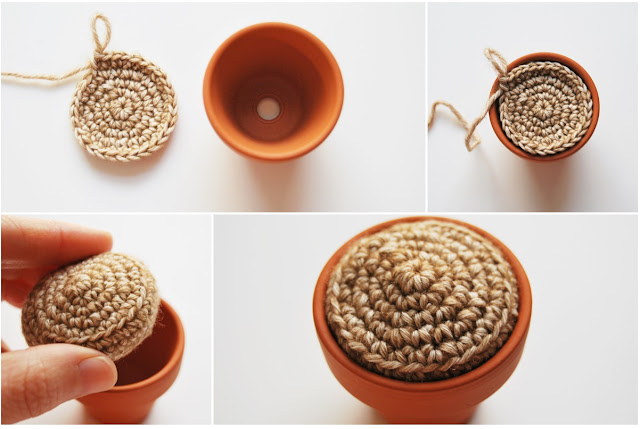
For the base, we’ll use the proportional increasing technique. In my case I’ve only needed 5 rounds, you can keep increasing as long as you need to reach the size of the pot circumference.
Base:
1st round: 6 sc in a magic ring.
2nd round: 6 increases (inc) (12 sc)
3rd round: (1 sc, 1 inc) x6 (24 sc)
4th round: (2 sc, 1 inc) x6 (30 sc)
5th round: (3 sc, 1 inc) x6 (36 sc)
6th round: 36 sc in bl
7th and 8th rounds: 36 sc
Para la base utilizaremos el método del aumento proporcional. En mi caso sólo me ha hecho falta llegar a la 5ª fila, tú puedes seguir aumentando hasta lo que necesites hasta llegar a la circunferencia de la maceta.
Base:
1ª vuelta (vta.): Con el algodón marrón, 6 pb en anillo mágico.
2ª vta.: 6 aumentos (aum) (12 pb)
3ª vta.: (1 pb, 1 aum) x6 (24 pb)
4ª vta.: (2 pb, 1 aum) x6 (30 pb)
5ª vta.: (3 pb, 1 aum) x6 (36 pb)
6ª vta.: 36 pb en bl
7ª y 8ª vta.: 36 pb
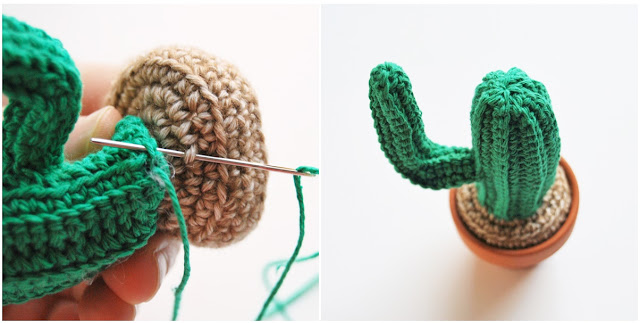
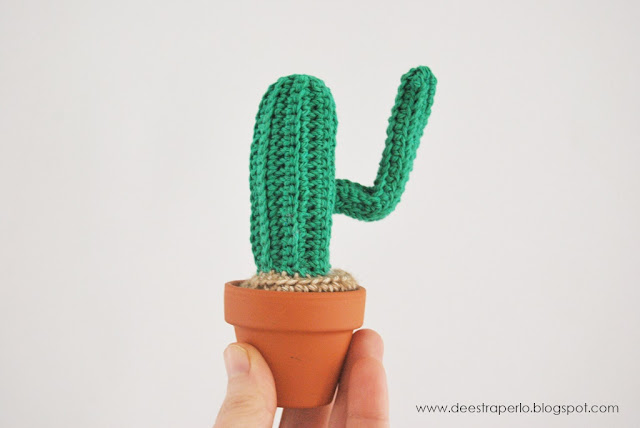
Now you just have to attach the body to the base with the tapestry needle. Adjust the base into the pot and that’s it. You know that cactuses like water but not in excess so don’t water it too much. Take care of it as Minus would do!
Ya sólo te falta unir el cuerpo a la base. Cóselos con la aguja lanera, bien centrado y encaja la base en la maceta. Ya sabes que a los cactus les gusta el agua, pero no con demasiada frecuencia, así que no no te pases con los riegos. ¡Cuídalo como lo cuidaría Minus!
By the way… Minus’ cousin, Karl, is over here these days. Well, turns out that he’s a cactuses fan, can you believe it?! So he’s helping Minus to take care of his and he’s also starting to prepare the garden for the springtime. Honestly I think it’s too early for that, but whatever… we all have our own way…
Por cierto, estos días está por aquí el primo de Minus, Karl. Bien, pues resulta que es un fanático de los cactus! Le está ayudando a Minus a cuidar el suyo, y además está empezando a preparar el jardín para la primavera. A mi, la verdad, me parece que aún es muy pronto para eso, pero allá cada uno y sus manías…
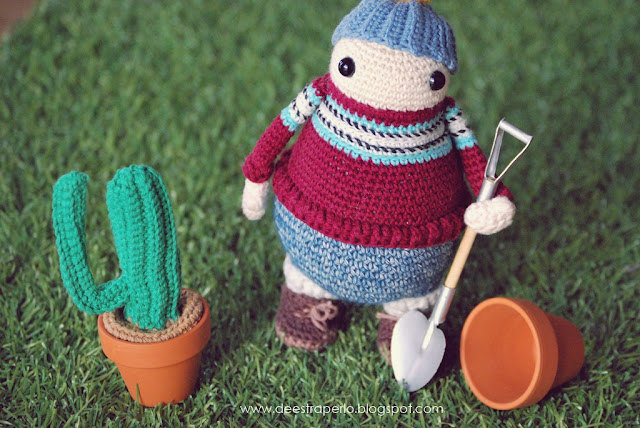
Ahora ya tienes el cactus, te falta Karl!


